Wednesday, October 28, 2009

Christmas Dollhouse Pillow


Here is a variation I made on the dollhouse pillow, as suggested by mom. I love the stockings by the fireplace.

Halloween photoshop fun


Found a new site called Picnik.com, lots of fun. Here are my spooky kids.

Wednesday, September 30, 2009

My 2 year old...


...is always busy

Harvest Dinner pt. 2


Ok, here is the pillowcase dollhouse to go with the dolls from pt. 1. I'll be sending it north this weekend. Now I have to make one for my own kids. I should have made a pattern as I went.

Thursday, September 24, 2009

Harvest Dinner pt.1


My hometown annual fundraiser to benefit the local ambulance (thanks, mom!) is coming up. Here is part one of my contribution. I have yet to come up with a name for them, but they are cute, nonetheless. Riley loves them, and the boys want me to make some male counterparts.

Sunday, September 20, 2009

Gentry Belle


Isn't she sweet?!

baby in a tutu


Tulle, an elastic waistband and a 3 month old. cute.

Wednesday, September 16, 2009

Little witch


This is what I did today with one black t-shirt, 1/2 yard fun fabric, and 1/2 hour. I am quite pleased.

Friday, August 21, 2009

Confetti zucchini bread

I altered a recipe that my cool big sis recommended from Paula Deen

Ingredients:
2 c all-purpose flour
1 1/4 c. whole wheat flour
1 t salt
2 1/2 t. baking soda
1 t cinnamon
1 t nutmeg
2 1/3 c sugar
1/2 c veg oil
1/2 c applesauce
4 eggs, beaten
1/3 c. drained zucchini juice (from zucchini below, or just use water)
1 c. grated zucchini
1 c. grated yellow summer squash
1/2 c. grated carrot
1 t. vanilla
Directions: Preheat oven to 350 degrees. In a large bowl, combine dry ingredients. In a separate bowl, combine oil, applesauce, eggs, zucchini juice/water, vanilla, zucchini, squash, and carrot. Mix wet ingredients into dry. Add 1 c chopped nuts if desired (i didn't). Bake in 3 standard loaf pans, sprayed with nonstick spray, for 30-40 minutes, or until a tester comes out clean (my oven bakes fast, so the time may vary).

Everyone loved it, although the kids wanted to know what the orange stuff was. I avoided the question. I doubled the recipe with no problem, and froze a bunch of it sliced for school lunches.

Friday, April 24, 2009

Introducing...


Gentry Belle
born April 22, 2009
7 lbs. 5 oz.
20 inches

Monday, April 20, 2009

A Sunday game


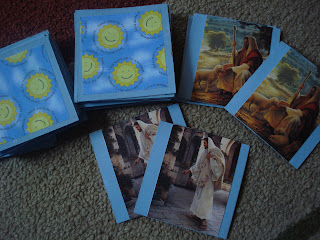
Since it is not always easy to come up with something for my kids to do on a Sunday afternoon, I decided to make them a memory game using artwork by Greg Olson. I bought 2 packs of his "Beautiful Savior" pictures so I could have matching images. Then a cut pieces of chipboard (from the scrapbooking section of our craft store) into 4"x4" squares. I painted both sides a nice blue acrylic paint and let it dry. I then modge-podged the pictures (which were 3"x4") on one side, after that dried I modge-podged 3 1/2"x 3 1/2" squares of this cute "Jesus wants me for a sunbeam" print my mom drew for me on the other side. I think I will still do an additional layer of modge-podge, and also paint the sides of the chipboard so that they look a little cleaner. Very easy project, but now my basement smells of modge podge!

Wednesday, April 8, 2009

What we've been up to


Well, it has been pretty busy around here lately. We have
-made 2 cars for the pinewood derby (Ethan won his division, and Mason was able to race well in the open division)
-(almost) finished the last room in our basement- the kids were happy to help paint
-made many art projects over this spring break
- continue to wait for baby, who should come any day now

Saturday, March 21, 2009

Baby legs


I found a super-easy tutorial to follow on Flikr for making these cute "baby legs". Very fast and easy. I sewed them from a fun 3-pk of socks I saw at Target.

Littlest pet shop birthday


Riley requested a Littlest pet shop birthday, and so I complied. After her dad greeted her after school with a bouquet of 7 helium balloons, which she loved, we headed home for her party. We had a homemade LPS board game, with necessary mini-games (such as: pin the belly on the Panda, Find the "hamster" in the shredded paper, stomp the cat tail, and find the hidden dog bones), mini cake, mini dinner (very small sandwiches, mandarin oranges, goldfish crackers, teddy grahams, baby carrot sticks, and mini apple juice boxes and mini cans of soda. We finished up by each "adopting" a littlest pet (although the boys opted for the more manly Bakugan toys I found) and decorating a home for it.

Monday, March 9, 2009

Baby shoes


I found this super-cute baby shoe pattern online and had to try my hand at them. I'll donate the broncos (which still needs a football button sew on) and the pink pair to a local fundraiser my husband is in charge of, but I'm keeping the orange for my soon-to-arrive little one (if it's a girl, I don't think a little boy would like them as well).

Thursday, February 26, 2009

Valentine's boxes


I found these cute little mailboxes at Target, and bought one for each member of our family. One night we each decorated our own and then everyone was encouraged to leave nice notes, etc. for the others during the week leading up to V-day. I left something in their mailbox for them to discover each morning, alternating treat (food) and fun thing (non-food). Riley woke up extra-early all week just to check out her mailbox. I have put them away until next year, when we will do it again.

Sunday, February 22, 2009

Mario Party


My 2 older boys have birthdays within 3 days of each other, so this year we decided to hold a combined party for them with the Mario/ Nintendo theme (they love to play it with their dad on the Wii). When the kids came in from their half-day of school, they were dressed as a character from the Mario games (Ethan-Luigi, Mason-Mario, Riley-princess Peach, Carson- Yoshi, and Kiechel- Wario) which mostly consisted of the appropriately colored T-shirts plus hats, crowns, and mustaches. Then they stepped onto the giant gameboard I had set up in our front room. The took turns and rolled the dice to advance on the board. I covered one side of the dice with an M, if it was rolled, we played a mini-game (there were 6: smash the chain chomp- a pinata painted to look like a chain chomp; Save Princess Peach- a follow the clues which led them to a large Princess Peach cut out along with a treasure chest of coins; Get the goomba- stomping brown balloons with coins inside; Tic Tac Drop- trying to get 3 in a row by dropping rice-filled balloons onto a 3x3 grid; Yoshi's egg hunt- filled easter eggs with coins for a hunt outside; and Musical Mario "chairs"- we downloaded a couple of versions of the Mario songs from iTunes and the kids walked around on pictures of different Mario characters, when the music stopped, I drew a picture from a hat, whoever was standing on that character was out). The kids earned coins (purchased from HobbyLobby) for each of the mini-games. After they each reached the end of our giant board game, they had the chance to trade in their coins for a prize (small toys I had purchased and hidden). We then ate pizza and then had a Boo cake with ice cream. A memorable day for certain.

Tuesday, February 3, 2009

Cute bag


My little sis came over the other day with an idea for a cute bag, so we sewed one up. I think it turned out quite nicely. We cut 1- 9"x9" square of white flannel on the fold (making it an 18"x9" rectangle). Then we cut out 3 sets of leaves from green felt and sewed them on to one side of the rectangle with just one straight stitch down the middle. Next we sewed on 3 lengths of different colored ribbon to make the stems for our flowers. I sewed a button to the top of each ribbon. As I sewed, my sister cut out a few flower heads from different colored felt and cut a small slit (large enough to fit over the button) in the middle. Now the flower heads can be moved around for fun and/or to change the look of the bag. To finish the bag, we straight-stitched the bottom and sides, turned under and stitched the top edges, then attached 2 lengths of the same white flannel that we had cut into 3-inch widths, folded in half, sewed at 1/4" seam, turned right side out and then stitched again for added stability. The handles we attached with a box shaped seam for strength.

Wednesday, January 21, 2009

Babies, babies, everywhere


My sister just had a little boy a couple of weeks ago, and there are several friends of mine at church who have had babies this month, not to mention my newest coming in April. With all these babies, I needed a new baby gift/craft. I combined a few different variations to come up with my own spin of a cute baby burp cloth. I bought a 12-pack of single fold diapers (you can use double fold, just skip the next step) and then folded them in half so they were approximately 12 inches wide. I bought a cute flannel (1 yard) and ribbon to match. After pre-washing the flannel, I cut it in 12-inch widths for the entire yard length, giving me 3- 12"x36" rectangles. Next I pinned 2 lengths of ribbon onto the folded diaper. I sewed the flannel to the diaper (12-inch ends) right sides together. Next, turn it right side out and edge stitch the selvages to the flannel side. Turn wrong side out. Since the flannel is longer than the diaper, I just centered the diaper in the middle of the flannel and stitched the long sides, leaving an opening to turn right side out- this leaves a cute flannel border to the nicely absorbant diaper. I then edge stitched the long sides with a straight stitch. Finally, zig-zag stitch the ribbons down (I sewed both sides of the ribbon). The end! This project was easy enough I let my 8-year old and 6-year old each sew one for their first sewing project.